

Amish Friendship Bread is a delightful tradition rooted in sharing and community. Passed along with a simple starter, this sweet bread recipe has been cherished for generations. It’s a testament to the joy of giving, as recipients not only receive a loaf of bread but also a starter to continue the cycle of baking and sharing.
This chocolate variation adds a rich twist to the classic recipe. With its moist texture and deep cocoa flavor, Amish Friendship Chocolate Bread is the perfect treat for chocolate lovers. Whether enjoyed as breakfast, dessert, or an afternoon snack, this bread will surely become a family favorite. The key to its magic lies in the starter—a living, fermenting mixture that brings a unique flavor and texture to the bread.
In this post, you’ll learn everything you need to know to make this recipe, from preparing the starter to baking a flawless loaf of chocolate bread. Whether you’re new to Amish Friendship Bread or a seasoned baker, this guide will walk you through every step. Let’s dive in and explore how to create this irresistible treat!
Ingredients Overview
The magic of Amish Friendship Chocolate Bread lies in its simple yet carefully chosen ingredients. Below is the complete list you’ll need, along with explanations of their role in creating this delicious bread.
Essential Ingredients for the Starter and Bread
- Amish Friendship Bread Starter
The heart of this recipe, the starter is a fermented mixture of flour, sugar, and milk. It imparts a tangy flavor and acts as a natural leavening agent. You’ll need 1 cup of starter for this bread. (Don’t worry, we’ll cover how to make or maintain it later!) - All-Purpose Flour (2 cups)
This creates the base of the bread, providing structure and texture. - Unsweetened Cocoa Powder (½ cup)
Adds the deep chocolate flavor that makes this variation special. Opt for high-quality cocoa powder for the best taste. - Sugar (1 cup)
Sweetens the bread to perfection. You can adjust slightly to taste or use brown sugar for added depth. - Milk (½ cup)
Combines with the starter to keep the batter moist and smooth. - Vegetable Oil (½ cup)
Ensures the bread stays soft and rich, even after baking. - Eggs (2 large)
Combine the ingredients to create a cohesive mixture, enhancing both moisture and richness. - Baking Powder and Baking Soda (1 teaspoon each)
Help the bread rise and achieve the perfect fluffy texture. - Vanilla Extract (1 teaspoon)
Enhances the overall flavor, pairing beautifully with the chocolate. - Salt (½ teaspoon)
Balances the sweetness and intensifies the chocolate flavor. - Chocolate Chips (1 cup)
These pockets of melted chocolate make each bite a decadent treat.
Optional Add-Ins
- Nuts (e.g., walnuts or pecans) for a crunchy contrast.
- Espresso Powder (1 teaspoon) to deepen the chocolate flavor.
Ingredient Notes for Success
- Substitutions: If you’re out of vegetable oil, melted butter or coconut oil works well.
- Gluten-Free Option: Replace all-purpose flour with a gluten-free baking mix for the perfect alternative.
- Dairy-Free Option: Use almond milk or oat milk instead of regular milk.
Preparing the Starter
The Amish Friendship Bread starter is the foundation of this recipe. It’s a living, fermenting mixture that adds a subtle tangy flavor and natural leavening to the bread. If you don’t already have a starter on hand, don’t worry! Here’s how to make and maintain one so you can enjoy this chocolatey delight.
How to Make an Amish Friendship Bread Starter
To prepare the starter from scratch, follow these simple steps:
Ingredients for the Starter
- 1 cup all-purpose flour
- 1 cup granulated sugar
- 1 cup milk
Directions
- Day 1: In a large, non-metallic bowl, combine the flour, sugar, and milk. Stir well until the mixture is smooth. Cover loosely with a cloth or plastic wrap.
- Days 2-4: Stir the starter once a day with a non-metal spoon. This keeps it active and aerated.
- Day 5: Feed the starter with 1 cup each of flour, sugar, and milk. Stir until smooth and cover again.
- Days 6-9: Continue stirring once a day.
- Day 10: The starter is ready to use! You can use 1 cup for your Amish Friendship Chocolate Bread and either share or refrigerate the rest.
💡 Tip: Keep your starter at room temperature and ensure it’s in a large enough container to allow room for fermentation.
How to Maintain and Share Your Starter
Once you’ve created the starter, maintaining it is simple:
- Feed the starter every 5-7 days with 1 cup each of flour, sugar, and milk.
- Stir it daily if left at room temperature, or refrigerate it if not baking regularly (just remember to bring it back to room temperature before use).
Sharing is a key tradition of Amish Friendship Bread. Portion the starter into 1-cup servings and give them to friends or family along with this recipe. This keeps the tradition alive while spreading joy!
Making the Chocolate Bread Batter
Now that your Amish Friendship Bread starter is ready, it’s time to bring the chocolate bread to life. This step-by-step guide will help you create a moist, flavorful batter for the perfect loaf of Amish Friendship Chocolate Bread.
Step-by-Step Instructions for the Batter
Ingredients
- 1 cup Amish Friendship Bread starter
- 2 cups all-purpose flour
- ½ cup unsweetened cocoa powder
- 1 cup sugar
- ½ teaspoon salt
- 1 teaspoon baking powder
- 1 teaspoon baking soda
- ½ cup milk
- ½ cup vegetable oil
- 2 large eggs
- 1 teaspoon vanilla extract
- 1 cup chocolate chips
- Optional: ½ cup nuts (e.g., walnuts or pecans)
Instructions to Make the Batter
- Preheat the Oven
- Set your oven to 325°F (165°C). Grease and flour two 9×5-inch loaf pans or line them with parchment paper for easy cleanup.
- Mix the Dry Ingredients
- In a medium bowl, whisk together the flour, cocoa powder, sugar, baking powder, baking soda, and salt. This ensures even distribution of the leavening agents and cocoa powder.
- Combine the Wet Ingredients
- In a large mixing bowl, combine the starter, milk, oil, eggs, and vanilla extract. Mix well until smooth and uniform.
- Incorporate the Dry Ingredients
- Slowly incorporate the dry ingredients into the wet mixture. Stir gently until just combined. Avoid overmixing, as this can result in dense bread.
- Add Chocolate Chips and Extras
- Fold in the chocolate chips and any optional add-ins like nuts or espresso powder. This step creates bursts of flavor in every slice.
- Fill the Pans
- Evenly distribute the batter into the prepared loaf pans. Smooth the tops with a spatula.
Pro Tips for Perfect Batter
- Don’t Skip Preheating: Ensuring the oven is at the right temperature helps the bread rise properly.
- Measure Accurately: Use level measurements for dry ingredients to maintain the right consistency.
- Use High-Quality Chocolate: Opt for semi-sweet or dark chocolate chips for the best flavor.
Baking Tips for Perfection
Baking Amish Friendship Chocolate Bread to perfection requires a balance of proper technique and attention to detail. Follow these tips and instructions to ensure your bread comes out moist, rich, and evenly baked.
Step-by-Step Baking Instructions
- Bake the Bread
- Place the prepared loaf pans into the preheated 325°F (165°C) oven.
- Bake for 50–60 minutes, or until a toothpick inserted in the center comes out clean. If you see a few moist crumbs on the toothpick, that’s okay—it indicates a soft, tender crumb.
- Check for Doneness
- Avoid overbaking by checking the bread around the 50-minute mark. If the top browns too quickly, tent the bread with aluminum foil to prevent it from burning.
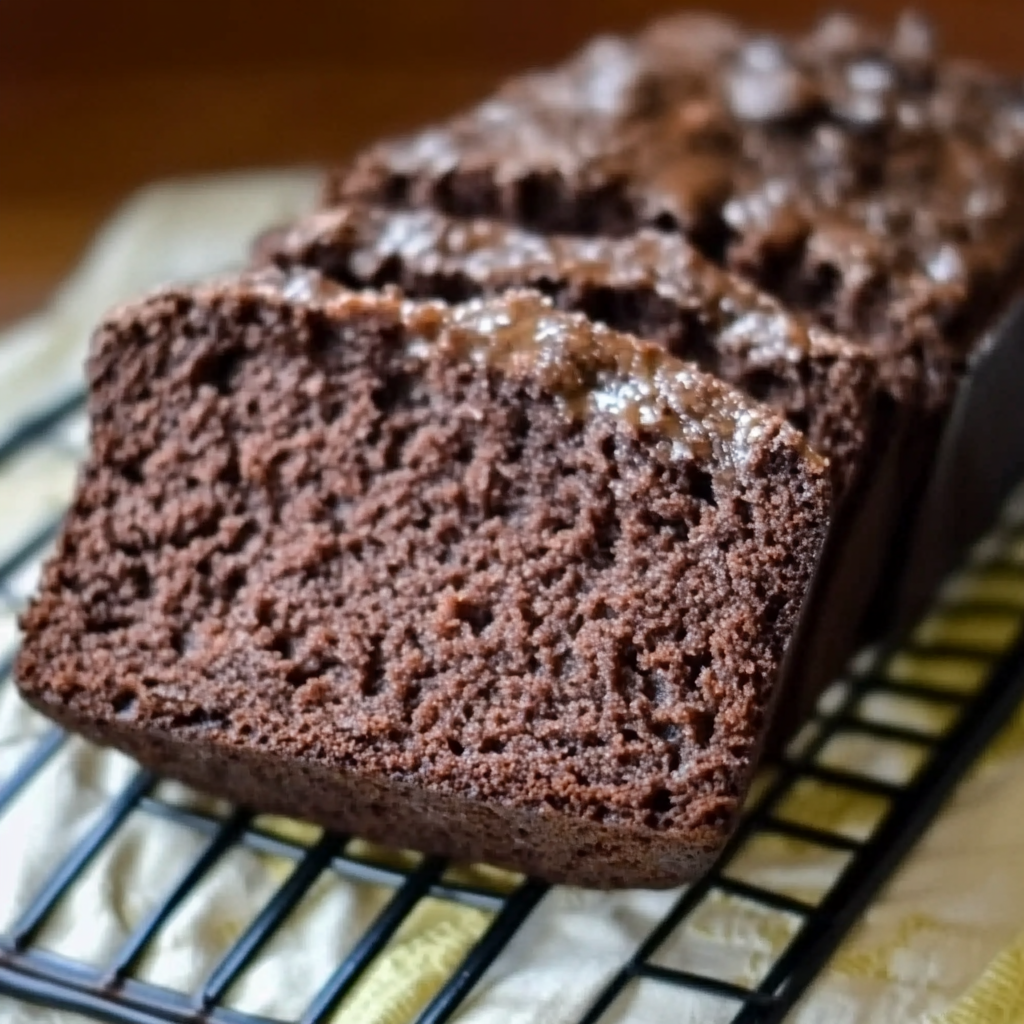
- Cool the Bread
- Once baked, allow the loaves to cool in the pans for about 10 minutes. Next, transfer the loaves to a wire rack and let them cool completely. This step helps prevent soggy bottoms and makes slicing easier.
Common Baking Mistakes to Avoid
- Overmixing the Batter
Mixing too much after adding the dry ingredients can lead to dense, tough bread. Stir just until the flour is incorporated. - Ignoring Oven Temperature Variations
If your bread isn’t baking evenly, invest in an oven thermometer to check for accuracy. - Skipping Proper Pan Prep
Greasing and flouring your pans, or using parchment paper, ensures easy removal of the bread without sticking.
Enhancing the Baking Experience
- Add a Decorative Topping
Sprinkle extra chocolate chips or chopped nuts on top of the batter before baking for an eye-catching finish. - Test Mini Loaves
If you want to make smaller portions, divide the batter into mini loaf pans or muffin tins. Adjust the baking time to approximately 20–25 minutes for muffins and 30–35 minutes for mini loaves. - Use Convection Settings (Optional)
If your oven has a convection option, bake at 300°F (150°C) for slightly faster and more even baking.Baking Tips for Perfection
Baking Amish Friendship Chocolate Bread to perfection requires a balance of proper technique and attention to detail. Follow these tips and instructions to ensure your bread comes out moist, rich, and evenly baked.
Step-by-Step Baking Instructions
- Bake the Bread
- Place the prepared loaf pans into the preheated 325°F (165°C) oven.
- Bake for 50–60 minutes, or until a toothpick inserted into the center comes out clean. If you see a few moist crumbs on the toothpick, that’s okay—it indicates a soft, tender crumb.
- Check for Doneness
- Avoid overbaking by checking the bread around the 50-minute mark. If the top browns too quickly, tent the bread with aluminum foil to prevent it from burning.
- Cool the Bread
- Once baked, allow the loaves to cool in the pans for about 10 minutes. Then, transfer them to a wire rack to cool completely. This step prevents soggy bottoms and ensures easier slicing.
Common Baking Mistakes to Avoid
- Overmixing the Batter
Mixing too much after adding the dry ingredients can lead to dense, tough bread. Stir just until the flour is incorporated. - Ignoring Oven Temperature Variations
If your bread isn’t baking evenly, invest in an oven thermometer to check for accuracy. - Skipping Proper Pan Prep
Greasing and flouring your pans, or using parchment paper, ensures easy removal of the bread without sticking.
Enhancing the Baking Experience
- Add a Decorative Topping
Sprinkle extra chocolate chips or chopped nuts on top of the batter before baking for an eye-catching finish. - Test Mini Loaves
If you want to make smaller portions, divide the batter into mini loaf pans or muffin tins. Adjust the baking time to approximately 20–25 minutes for muffins and 30–35 minutes for mini loaves. - Use Convection Settings (Optional)
If your oven has a convection option, bake at 300°F (150°C) for slightly faster and more even baking.
- Bake the Bread
Serving and Storing the Bread
Your Amish Friendship Chocolate Bread is ready, and now it’s time to enjoy it! Knowing how to serve and store this delicious treat will ensure you get the most out of your efforts.
Creative Ways to Serve the Bread
- As a Sweet Breakfast Treat
- Pair a slice with your morning coffee or tea for a rich, chocolatey start to your day.
- Dress It Up as Dessert
- Add a dollop of whipped cream or a drizzle of chocolate syrup for an indulgent dessert.
- Serve warm with a scoop of vanilla ice cream for a decadent pairing.
- Midday Snack
- Spread a thin layer of cream cheese or peanut butter for a balanced snack.
- Gift It to Friends and Family
- Wrap a loaf in decorative parchment or foil and pair it with a small jar of starter to spread the joy of baking.
How to Store Amish Friendship Chocolate Bread
- At Room Temperature
- Once completely cooled, wrap the bread tightly in plastic wrap or aluminum foil. Store it in an airtight container. It will stay fresh for up to 3 days at room temperature.
- In the Refrigerator
- To extend freshness, refrigerate the bread. Ensure it’s wrapped well to prevent it from drying out. It can last for up to 7 days in the fridge.
- Freezing the Bread
- For long-term storage, wrap individual slices or whole loaves in plastic wrap, then place them in a freezer-safe bag.
- Freeze for up to 3 months. Thaw slices at room temperature or warm them in the microwave for 10–15 seconds.
Tips for Maximum Freshness
- Avoid Cutting Too Early
Letting the bread cool completely before slicing prevents it from crumbling. - Prevent Drying Out
Always store the bread in a tightly sealed container, especially in dry climates. - Reheat for a Fresh Taste
Warm slices in the microwave or oven to restore their soft, rich texture.
Frequently Asked Questions (FAQs)
Here are answers to some of the most common questions about Amish Friendship Chocolate Bread. Whether you’re a first-time baker or a seasoned pro, these tips will help you troubleshoot and customize your recipe.
1. Can I Make This Recipe Without the Starter?
The Amish Friendship Bread starter is essential to achieving the unique flavor and texture of this bread. However, if you don’t have a starter, you can create a similar taste by using:
- ½ cup plain yogurt
- ½ cup milk
- 1 teaspoon yeast
Mix these together and let them sit for 10–15 minutes before using them as a substitute.
2. How Do I Store and Feed the Starter?
The starter should be stored in a non-metallic container at room temperature or in the refrigerator:
- Room Temperature: Stir daily and feed every 5–7 days (1 cup each of flour, sugar, and milk).
- Refrigerated: Feed every 7–10 days and bring it to room temperature before baking.
3. Can I Freeze the Starter?
Yes! The starter can be frozen for up to 3 months. Portion 1-cup servings into freezer-safe bags or containers, label them with the date, and thaw completely before using.
4. Can I Add Extra Flavors to the Bread?
Absolutely! This recipe is versatile, and you can customize it with:
- Spices: Add ½ teaspoon of cinnamon or nutmeg for warmth.
- Extracts: Swap vanilla for almond or hazelnut extract for a different flavor profile.
- Mix-ins: Try white chocolate chips, dried cherries, or shredded coconut for added variety.
5. Can I Freeze the Bread After Baking?
Yes, Amish Friendship Chocolate Bread freezes beautifully. Wrap the loaf or individual slices tightly in plastic wrap and place them in a freezer-safe bag. Thaw at room temperature and enjoy within 3 months for the best quality.
6. How Can I Fix Dry or Dense Bread?
If your bread turns out dry or dense:
- Avoid Overmixing: Overmixing the batter can cause toughness.
- Check Your Oven Temperature: Too high a temperature can dry out the bread. Use an oven thermometer to verify.
- Don’t Overbake: Start checking for doneness at the 50-minute mark.
7. Can I Use This Recipe for Muffins?
Yes, the batter works wonderfully for muffins! Divide it into a greased or lined muffin tin and bake at 325°F (165°C) for 20–25 minutes. Check for doneness with a toothpick.