

Introduction
Life can get busy, and finding a quick, nutritious breakfast is often a challenge. That’s where homemade granola bars come in. These versatile, portable snacks are not only perfect for hectic mornings but also make a great midday energy boost. Unlike many store-bought options, which can be packed with added sugars and preservatives, homemade granola bars allow you to control every ingredient. You can customize the flavors, textures, and nutritional content to suit your preferences and dietary needs.
Making granola bars at home is easier than you might think. With just a few pantry staples and minimal effort, you can whip up a batch that’s as delicious as it is wholesome. Plus, they’re budget-friendly and can be tailored for anyone in the family, from picky eaters to health enthusiasts.
Whether you’re heading out the door, packing a lunchbox, or needing a post-workout snack, these homemade granola bars are a game-changer. In this guide, we’ll explore the ingredients, steps, and storage tips to help you master the art of making your own granola bars
Ingredients for Homemade Granola Bars
Making homemade granola bars starts with a few simple ingredients that you likely already have in your pantry. The beauty of this recipe is its flexibility—you can mix and match to suit your tastes and dietary needs. Here’s a breakdown of the essential components:
1. Core Ingredients for Structure
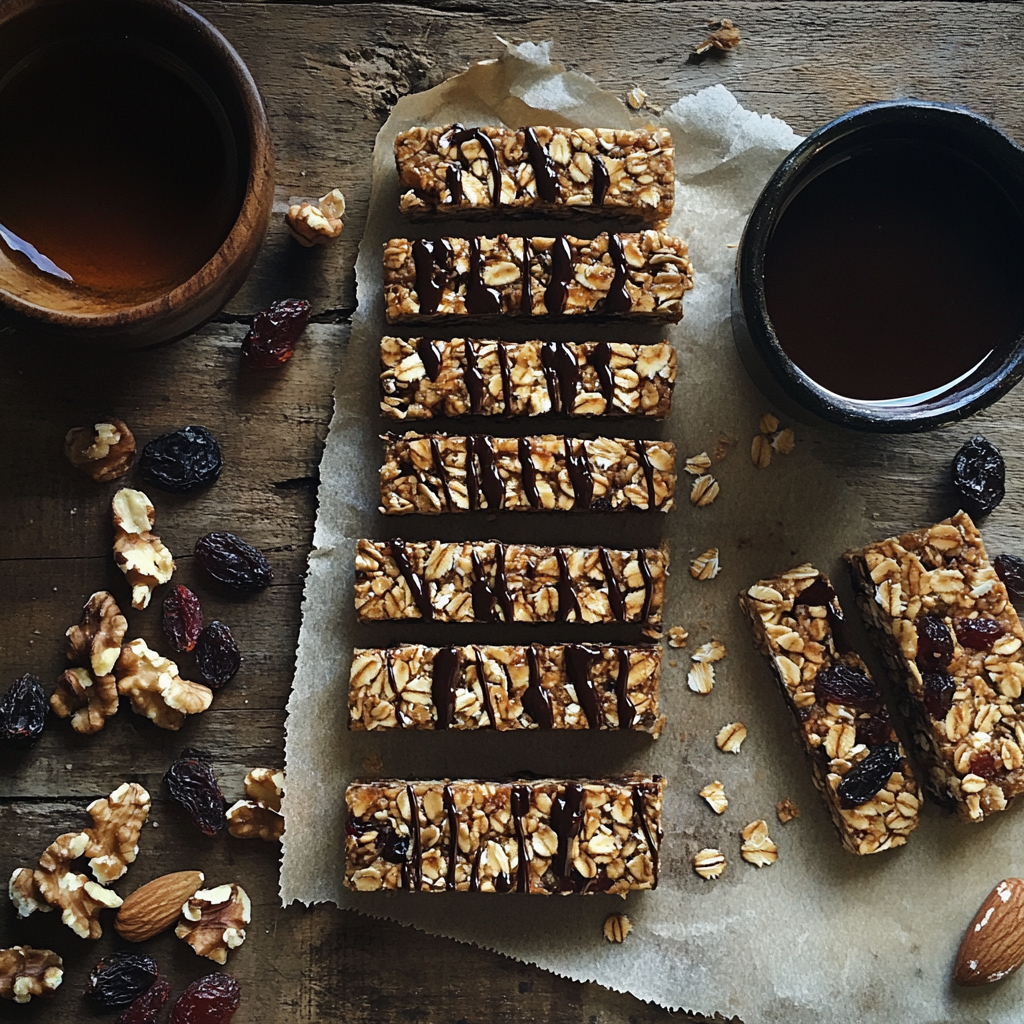
- Rolled oats: The foundation of any good granola bar. Old-fashioned oats work best for a chewy texture, while quick oats create a softer consistency.
- Binding agents: Honey, maple syrup, or agave nectar serve as natural sweeteners and hold everything together. For vegan options, use agave or maple syrup.
- Nut butter: Peanut butter, almond butter, or sunflower seed butter add richness and act as an additional binder.
2. Add-Ins for Flavor and Nutrition
- Nuts and seeds: Almonds, walnuts, chia seeds, or sunflower seeds provide crunch and healthy fats.
- Dried fruits: Raisins, dried cranberries, chopped dates, or apricots offer natural sweetness and a chewy texture.
- Chocolate or yogurt chips: A touch of sweetness can elevate your granola bars to dessert-like territory.
- Spices and flavorings: Cinnamon, vanilla extract, or a pinch of salt enhance the overall flavor profile.
3. Optional Ingredients for Variety
- Protein powder: For an extra nutritional boost, add a scoop of your favorite protein powder.
- Coconut flakes: Unsweetened shredded coconut adds a tropical twist.
- Puffed grains: Puffed rice or quinoa can give the bars a light, airy texture.
Ingredient Substitutions for Dietary Needs
- Gluten-free: Ensure your oats are certified gluten-free.
- Nut-free: Replace nut butter with sunflower seed butter, and use seeds instead of nuts.
- Low-sugar: Opt for unsweetened dried fruits and use a smaller amount of sweetener.
With these ingredients, you can create endless combinations to keep your granola bars exciting and nutritious. The key is to balance wet and dry ingredients to achieve a consistency that holds together without being overly sticky or crumbly.
Step-by-Step Instructions for Homemade Granola Bars
Preparing your own granola bars at home is easier than you might think. Follow these easy steps to create a batch of delicious, customizable bars that are perfect for any occasion. This recipe includes a no-bake option for added convenience.
1. Gather Your Ingredients
Before you begin, measure and prepare your ingredients. This ensures the process goes smoothly and prevents the mixture from hardening before you’re ready to shape it.
2. Mix the Dry Ingredients
In a large mixing bowl, combine the following:
- Rolled oats (about 2 cups for most recipes).
- Chopped nuts or seeds (½ cup for crunch).
- Dried fruits (½ cup for sweetness).
- Any additional mix-ins, like coconut flakes or spices.
Stir well to distribute everything evenly.
3. Prepare the Wet Ingredients
In a small saucepan, heat your chosen binding ingredients:
- ½ cup honey, maple syrup, or agave nectar.
- ½ cup nut or seed butter (e.g., peanut butter or almond butter).
- 1 tsp vanilla extract for added flavor.
Heat on low and stir continuously until the mixture is smooth and well combined. Ensure that it doesn’t reach a boil, as boiling can change the texture.
4. Combine Wet and Dry Mixtures
Pour the warm liquid mixture over the dry ingredients in your mixing bowl. Stir thoroughly to ensure all the dry components are coated. The mixture should be sticky and cohesive.
5. Transfer to a Pan
Line an 8×8-inch or 9×9-inch baking pan with parchment paper. Press the granola mixture firmly into the pan using the back of a spoon or your hands (lightly greased to prevent sticking). Ensure the mixture is evenly distributed and tightly packed to avoid crumbling later.
6. Chill or Bake
- No-bake option: Place the pan in the refrigerator for at least 2 hours or until the mixture hardens.
- Baking option: Preheat your oven to 325°F (160°C) and bake for 15-20 minutes for a toasted flavor and firmer texture. Allow the pan to cool completely before cutting.
7. Slice and Store
Once the mixture is set, lift it out of the pan using the parchment paper. Use a sharp knife to cut into bars or squares of your desired size. Store the bars in an airtight container in the refrigerator for up to 2 weeks, or freeze for up to 3 months.
Tips for Success:
- If your mixture is too dry, add a little extra nut butter or sweetener. If it’s too sticky, sprinkle in more oats.
- Pressing the mixture firmly into the pan is crucial for bars that hold their shape.
- For a professional look, drizzle melted chocolate over the bars before chilling.
Flavor Variations for Homemade Granola Bars
One of the best things about homemade granola bars is their versatility. With just a few swaps or additions, you can create a variety of flavors to suit your taste buds. Below are some crowd-pleasing ideas to inspire your next batch of granola bars.
1. Classic Chocolate Chip Granola Bars
- Additions: Mini chocolate chips (½ cup) and a dash of vanilla extract.
- Tips: Let the mixture cool slightly before stirring in the chocolate chips to prevent them from melting.
- Perfect for: A nostalgic treat that appeals to both kids and adults.
2. Peanut Butter and Banana Bars
- Additions: Dried banana chips (½ cup), peanut butter as the binder, and a sprinkle of cinnamon.
- Tips: Drizzle with melted dark chocolate for a finishing touch.
- Perfect for: A satisfying breakfast or post-workout snack.
3. Tropical Coconut Delight
- Additions: Unsweetened shredded coconut (½ cup), dried pineapple or mango (¼ cup), and macadamia nuts (¼ cup).
- Tips: Add a small splash of coconut extract for an extra burst of tropical flavor.
- Perfect for: A taste of summer in every bite.
4. High-Protein Power Bars
- Additions: A scoop of protein powder (choose your favorite flavor), chia seeds (2 tbsp), and crushed almonds.
- Tips: Adjust the wet ingredients slightly to compensate for the dryness of the protein powder.
- Perfect for: Athletes or anyone looking for an energy-packed snack.
5. Cranberry Almond Bars
- Additions: Dried cranberries (½ cup), sliced almonds (¼ cup), and a hint of orange zest.
- Tips: Substitute honey with maple syrup for a different twist on sweetness.
- Perfect for: A festive snack or gift during the holiday season.
6. Spiced Apple Cinnamon Bars
- Additions: Dried apple pieces (½ cup), ground cinnamon (1 tsp), and a pinch of nutmeg.
- Tips: Pair with a drizzle of caramel sauce for a dessert-like bar.
- Perfect for: A comforting fall-inspired snack.
Customize Your Own
Don’t be afraid to experiment! Combine your favorite ingredients to create a bar that’s uniquely yours. Here are some mix-and-match ideas:
- Sweeteners: Honey, maple syrup, or even date syrup.
- Textures: Add puffed rice for crunch or mashed bananas for softness.
- Special Extras: Sprinkle sea salt on top for a sweet-savory combination.
Why Customization Matters
Homemade granola bars allow you to cater to dietary preferences and cravings. Whether you’re avoiding allergens, reducing sugar, or simply exploring new flavors, the options are endless.
Storage Tips and Shelf Life for Homemade Granola Bars
To make the most of your homemade granola bars, proper storage is essential. With the right techniques, you can keep them fresh and flavorful for weeks—or even months. Here’s how to store your granola bars and maintain their perfect texture.
1. Room Temperature Storage
- How to store: Place the granola bars in an airtight container. To prevent them from sticking together, separate layers with parchment or wax paper.
- Shelf life: Homemade granola bars will stay fresh at room temperature for up to 1 week.
- Best for: Bars with no perishable ingredients, such as chocolate chips, oats, and dried fruits.
2. Refrigerator Storage
- How to store: Transfer the bars to an airtight container or resealable bag. Line the container with parchment paper to make it easy to remove individual bars.
- Shelf life: Refrigerated granola bars can last up to 2 weeks.
- Best for: Bars containing nut butter, fresh fruit, or any other ingredient that might spoil quickly.
3. Freezer Storage
- How to store: Wrap each bar individually in plastic wrap or parchment paper, then place them in a freezer-safe zip-top bag. Remove as much air as possible to prevent freezer burn.
- Shelf life: Frozen granola bars remain fresh for up to 3 months.
- How to thaw: Remove a bar from the freezer and let it sit at room temperature for 15-20 minutes before eating.
- Best for: Large batches you want to prepare in advance.
4. Keep Moisture and Air Out
Air and moisture can cause granola bars to lose their texture or go stale. Always ensure your storage container is tightly sealed. If you’re using zip-top bags, press out excess air before sealing.
Tips for Maintaining Texture
- Prevent sogginess: If your bars contain fresh fruit or are extra sticky, store them in the fridge to avoid softening.
- Avoid drying out: If you notice your bars becoming too hard, add a slice of bread or an apple slice to the container temporarily to restore moisture.
Can You Extend Shelf Life?
Yes! Using stabilizers like honey or maple syrup not only binds the bars but also acts as a natural preservative. Additionally, keeping granola bars refrigerated or frozen is the easiest way to enjoy them longer without compromising flavor or texture.
By storing your homemade granola bars properly, you’ll always have a quick, delicious snack ready to grab on your busiest days.
Health Benefits of Homemade Granola Bars
Homemade granola bars are more than just a convenient snack—they’re a nutrient-packed option that supports a healthy lifestyle. By preparing your own, you gain control over the ingredients, ensuring a wholesome treat tailored to your nutritional needs. Here’s a closer look at the health benefits of these versatile bars.
1. Packed with Nutritional Goodness
- Whole grains: Rolled oats are a rich source of fiber, promoting digestion and helping you stay full longer. They also provide steady energy, making them perfect for breakfast or pre-workout snacks.
- Healthy fats: Nuts, seeds, and nut butters contribute heart-healthy fats, which can support brain function and lower cholesterol levels.
- Natural sweetness: Unlike many store-bought bars loaded with refined sugars, homemade versions use natural sweeteners like honey or maple syrup, reducing the risk of blood sugar spikes.
2. Customizable for Dietary Needs
Homemade granola bars can be adjusted to suit virtually any diet:
- Gluten-free: Use certified gluten-free oats and avoid gluten-containing add-ins.
- Vegan: Replace honey with agave nectar or maple syrup and ensure all mix-ins are plant-based.
- Low-sugar: Reduce sweeteners and rely on dried fruits for a naturally sweet flavor.
- High-protein: Add protein powder, chia seeds, or extra nuts to support muscle recovery and growth.
3. Free from Additives and Preservatives
Store-bought bars often include artificial flavors, preservatives, and excessive sodium. By making your own, you eliminate these unnecessary additives, ensuring a cleaner, healthier snack.
4. Controlled Portion Sizes
Homemade granola bars allow you to control the serving size. Whether you prefer bite-sized energy squares or hearty breakfast bars, you can cut them to fit your needs and avoid overeating.
How to Tailor Granola Bars for Specific Goals
- Weight management: Stick to nutrient-dense ingredients like oats, nuts, and dried fruits while avoiding excess sweeteners or chocolate.
- Energy boost: For endurance activities, add quick-digesting carbohydrates like puffed rice or dates.
- Post-workout recovery: Combine protein powder with nuts and seeds to aid muscle repair.
Why Homemade is Better for Your Health
The ability to customize your granola bars gives you an edge in achieving specific health goals. By choosing high-quality ingredients and avoiding hidden sugars or fats, you can transform this snack into a powerhouse of nutrition. Whether you’re fueling a workout, satisfying a mid-afternoon craving, or looking for a healthy breakfast alternative, homemade granola bars offer a perfect solution.
FAQs About Homemade Granola Bars
Homemade granola bars are easy to make and highly customizable, but you might still have questions about the process. Here are answers to some of the most commonly asked questions to ensure your granola bars turn out perfectly every time.
1. How Can I Keep My Granola Bars from Falling Apart?
The key to cohesive granola bars lies in the ratio of wet to dry ingredients. Make sure:
- You use enough binding agents like honey, maple syrup, or nut butter.
- You press the mixture firmly and evenly into the pan before chilling or baking.
- You let the bars cool completely before cutting them. Cutting too soon can cause them to crumble.
2. Can I Make Granola Bars Vegan or Gluten-Free?
Absolutely! For vegan granola bars:
- Choose maple syrup or agave nectar in place of honey.
- Ensure all your mix-ins, such as chocolate chips, are dairy-free.
For gluten-free bars:
- Use certified gluten-free oats.
- Double-check that your additional ingredients, like nuts or dried fruits, are free from cross-contamination.
3. What’s the Best Way to Add Protein to Granola Bars?
You can boost the protein content by:
- Mixing in a scoop of your favorite protein powder (adjust the wet ingredients accordingly to avoid dryness).
- Adding seeds like chia, flax, or hemp.
- Incorporating high-protein nut butters or chopped nuts.
4. How Long Do Homemade Granola Bars Last?
- Room temperature: Up to 1 week in an airtight container.
- Refrigerator: Up to 2 weeks.
- Freezer: Up to 3 months. Thaw for about 15-20 minutes before eating.
Proper storage with parchment or wax paper between layers can prevent sticking and preserve freshness.
5. Can I Make No-Bake Granola Bars?
Yes, no-bake granola bars are easy and convenient. Simply mix the ingredients, press them into a pan, and chill in the refrigerator for at least 2 hours. This method works best with sticky binding agents like honey or maple syrup.
6. What Are Some Creative Flavor Ideas?
If you’re looking to try something new, consider:
- Adding spices like cinnamon or nutmeg for warmth.
- Experimenting with savory flavors by adding a pinch of sea salt and seeds.
- Combining unexpected ingredients, like dried chili flakes with dark chocolate, for a spicy kick.
7. Why Are Homemade Granola Bars Better Than Store-Bought?
Homemade granola bars:
- Contain no artificial preservatives or additives.
- Allow you to control the sugar and fat content.
- Are customizable to your dietary needs and flavor preferences.
- Can be made in bulk at a fraction of the cost of store-bought versions.
8. Can I Use Fresh Fruit Instead of Dried?
Fresh fruit is not recommended for granola bars, as it introduces too much moisture, which can lead to soggy bars and a shorter shelf life. Stick to dried fruits for the best results.
Conclusion: Why Homemade Granola Bars Are the Ultimate On-the-Go Breakfast
Homemade granola bars are the perfect solution for busy mornings, quick snacks, and satisfying energy boosts. Unlike their store-bought counterparts, they are free from unnecessary additives and loaded with wholesome, customizable ingredients that cater to your specific dietary needs. From their ease of preparation to their incredible versatility, these bars offer a winning combination of convenience, nutrition, and taste.
With endless flavor possibilities—from classic chocolate chip to spiced apple cinnamon—you can craft granola bars that suit any craving or occasion. Their adaptability means they’re not just a snack but a reflection of your personal preferences and health goals. Whether you’re focused on increasing protein, reducing sugar, or creating allergy-friendly options, homemade granola bars deliver on all fronts.
By following the simple tips and techniques outlined in this guide, you can easily master the art of making granola bars at home. Plus, with proper storage, you’ll always have a batch ready to fuel your day.
So why wait? Grab your ingredients, get creative with flavors, and experience the satisfaction of making your own granola bars. Whether you’re packing them for work, school, or outdoor adventures, they’re sure to become a staple in your kitchen. Let us know how your homemade granola bars turn out—and feel free to share your favorite combinations!