There’s something deeply satisfying about pulling a loaf of homemade bread from the oven. Especially when it’s golden, aromatic, and you didn’t even knead it. This article walks you through how to make no-knead garlic herb bread an artisan-style loaf that’s crunchy on the outside and soft, flavorful inside. You’ll learn the story behind this recipe, what ingredients make it magical, and how to master the slow-rise method that brings bakery results to your home kitchen.
Print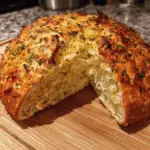
No-Knead Garlic Herb Bread
- Total Time: 13 hours
- Yield: 1 loaf 1x
- Diet: Vegetarian
Description
This no-knead garlic herb bread is crusty on the outside, soft inside, and packed with flavor. Perfect for pairing with soups, pastas, or toasting with butter.
Ingredients
3 cups all-purpose or bread flour
1/2 tsp instant yeast
1 1/2 tsp salt
1 1/2 cups warm water
3 cloves garlic, minced
1 tbsp dried Italian herbs (or fresh rosemary & thyme combo)
Olive oil (optional, for brushing crust)
Instructions
1. In a large bowl, mix flour, yeast, salt, garlic, and herbs.
2. Add warm water and stir until a sticky dough forms. No kneading needed!
3. Cover with plastic wrap or a towel and let it rest at room temp for 12–18 hours (overnight).
4. Turn dough onto a floured surface. Shape into a round ball using floured hands.
5. Let it rest for 30–60 minutes while your Dutch oven heats up at 450°F.
6. Place dough on parchment paper, score top with sharp knife, and lower into Dutch oven.
7. Cover and bake 30 minutes, then uncover and bake 15–20 minutes until golden brown.
8. Cool on a rack, slice, and enjoy!
Notes
For a golden finish, brush crust with olive oil or butter right after baking.
Use fresh herbs if available—rosemary and thyme work wonderfully.
- Prep Time: 10 minutes
- Cook Time: 45 minutes
- Category: Bread
- Method: Baking
- Cuisine: American
Nutrition
- Serving Size: 1 slice
- Calories: 140
- Sugar: 0g
- Sodium: 290mg
- Fat: 2g
- Saturated Fat: 0.3g
- Unsaturated Fat: 1.5g
- Trans Fat: 0g
- Carbohydrates: 27g
- Fiber: 1g
- Protein: 4g
- Cholesterol: 0mg
Keywords: no-knead garlic herb bread, easy artisan bread, dutch oven bread
No-Knead Garlic Herb Bread for Everyday Magic
Garlic & Herb Memories from My Kitchen
Hi, I’m Emily Truett. If you’d stepped into my kitchen one snowy January morning in West Lafayette, you’d have caught the scent of garlic and rosemary rising from a crusty, golden loaf cooling on the rack. I still remember the first time I made no-knead garlic herb bread. I was craving bakery bread but didn’t want the arm workout of kneading or the clean-up that comes with it.
What I did have? Flour, yeast, garlic, a few dried herbs, and time.
So I stirred everything together in a big bowl, covered it, and walked away. That night, while the dough worked its magic on the counter, I dreamed of warm, crusty slices and butter that melted instantly. When it finally came out of the oven—crackly on the outside, pillowy inside—I knew I’d stumbled on something I’d make again and again. It felt like a little miracle. Simple ingredients. No fuss. Big reward.
Now this recipe is my go-to companion for cozy soups from my soup collection or market-fresh pasta dishes like those in the comfort pasta series. It’s the kind of bread you bake once and wonder why you ever bought a loaf again.
Why No-Knead Bread Wins Every Time
So, why all the love for no-knead garlic herb bread? It’s beginner-friendly but doesn’t taste like it. There’s no need for fancy tools—just a bowl, spoon, and time. Letting the dough rest for 12 to 18 hours develops flavor naturally. The crust forms beautifully in a Dutch oven, and the herbs perfume your kitchen in the best way.
For anyone intimidated by yeast or unsure where to begin, this is the recipe to try first. It’s forgiving. It’s adaptable. And it rewards patience with the kind of slice that begs for butter or a dip in herbed olive oil. And if you’ve been experimenting with fermentation like my sourdough basics, this no-knead version feels like a close cousin—without the starter stress.

Simple Ingredients, Stunning Results
What You Need for the Perfect Loaf
The beauty of this no-knead garlic herb bread lies in its simplicity. With just a few pantry staples, you can achieve artisan-level flavor and texture—no kneading, no fuss.
Here’s what makes the magic happen:
| Ingredient | Purpose |
|---|---|
| All-Purpose or Bread Flour | Forms the structure—bread flour gives a chewier bite |
| Instant Yeast | Leavens the dough without proofing; easy for beginners |
| Salt | Enhances flavor and controls yeast activity |
| Warm Water | Hydrates and activates the yeast |
| Garlic (minced) | Infuses the dough with aromatic depth |
| Italian Herbs / Fresh Herbs | Provides herby fragrance and flavor throughout |
Want to customize the herb mix? Try rosemary and thyme for woodsy warmth, or basil and oregano for a Mediterranean twist. Use dried herbs for ease, or go fresh if you’ve got a garden or farmers market nearby. Just remember: fresh herbs are stronger. Replace every 1 tsp of dried with 1 tbsp of fresh.
For a complete guide to seasonal flavor swaps, check out the homemade bread category on Tasty Trails. You’ll find ideas from sun-dried tomato swirls to olive-packed loaves.
Overnight Rise: Why It Works
This recipe’s magic is in the wait. The dough rests at room temperature for 12–18 hours. That’s where the no-knead garlic herb bread gets its rustic crust, open crumb, and deep flavor. This slow fermentation method activates the yeast gradually, building complex taste and creating those beautiful air pockets inside.
If you’re not baking right away, refrigerate the dough for up to 3 days. As mentioned in Sally’s method, cold fermentation actually improves texture and flavor. Just bring it to room temp before shaping and baking.
A handy tip: place the dough in a large bowl to give it room to rise. Cover loosely with plastic wrap or a clean towel, and let time do its work. You’ll wake up to a bubbly, fragrant dough that’s ready to shape and bake.
Curious about other fermented breads? The sourdough section has beginner-friendly guides if you want to explore slow baking even further.
From Dough to Golden Loaf – The Method
How to Shape and Bake Like a Pro
After your dough has rested overnight, it should look bubbly and puffed, with a web-like texture underneath. That’s exactly what you want. Now comes the fun part—turning that shaggy mass into a beautiful, crusty loaf.
First, generously flour your work surface and hands. This dough will be sticky. Gently scrape the dough from the bowl and let it relax on the counter. You don’t need to knead—just tuck the edges underneath to form a round shape. If you’re intimidated, know that rustic is good. Imperfections bake up beautifully.
Let it rest again for 30 to 60 minutes while your oven heats. Place your Dutch oven with the lid on inside and preheat to 450°F (230°C). This is key—your pot must be hot when the dough goes in. It’s how we mimic steam ovens and achieve that golden crust.
Now, gently lift the dough using parchment paper and place it into the hot pot. Use a sharp knife to score the top—just one deep slash or an “X” works well. This helps the dough expand as it bakes.
Cover and bake for 30 minutes. Then, uncover and bake for another 15 to 20 minutes until the top is golden and crackly. For extra flavor, try this trick I use with my sourdough garlic cheese bread—brush the hot crust with olive oil or melted butter and sprinkle with flaky salt.
No Dutch oven? You can use a cast iron skillet covered tightly with foil, or a heavy baking dish with a lid. It may not trap steam as well, but the results still shine—especially when paired with a cozy bowl of creamy mushroom pasta.
Secrets to That Crusty Finish
Crust is all about heat and steam. Baking the dough inside a preheated pot traps moisture for the first half of the bake, allowing the bread to expand without drying out. When the lid is removed for the final 15–20 minutes, the crust caramelizes, crisps, and takes on that artisan bakery glow.
Want a more blistered crust? Before baking, spray the dough lightly with water or add a few ice cubes to the bottom of the Dutch oven. This will create steam that helps with crust formation. Just be cautious—it’s a hot environment, and safety comes first.
After baking, always let the bread cool on a wire rack. This prevents sogginess on the bottom and allows the crumb to finish setting. I know it’s hard to wait, but slicing too early releases steam and ruins the texture.
Looking for more rustic-style bakes? My garlic herb sourdough bread has similar crust goals with a longer fermentation process. And if you’re new to artisan baking, this technique bridges the gap perfectly.
Next, we’ll explore creative variations, storage tips, and clever ways to serve every last slice.
Bread Your Way: Variations & Leftovers
Flavor Twists to Try
Once you’ve mastered the base version of no-knead garlic herb bread, it’s time to play. This dough is incredibly forgiving and acts as the perfect canvas for a range of flavors. Here are some delicious twists you can mix in before the final rise:
| Add-In | Flavor Boost |
|---|---|
| Shredded Parmesan or Gruyère | Adds sharp, salty richness and melts into the crumb |
| Chopped Olives or Sun-Dried Tomatoes | Gives Mediterranean depth with briny bursts |
| Roasted Garlic | Softens the bite of raw garlic and adds sweet earthiness |
| Jalapeños or Crushed Red Pepper | Delivers a subtle or spicy kick, depending on quantity |
You can even go a little wild, like I did with these sourdough pull-apart garlic breads—just make sure your add-ins aren’t too wet, which could affect the dough’s hydration and bake time.
Pair this flavorful bread with a cozy bowl of creamy tomato basil soup, or serve it toasted under your favorite open-faced sandwich like my classic tuna melt. It also makes an epic base for herbed croutons or garlic toast.
How to Store, Freeze & Reheat Perfectly
Fresh bread is best the day it’s baked, but you can easily extend its life. Here’s how to store it like a pro:
- Room Temp: Store in a paper bag or wrapped in a clean kitchen towel for up to 2 days. Avoid plastic—it softens the crust.
- Freezing: Let the bread cool completely, then wrap tightly in foil or freezer-safe wrap. Freeze whole or in slices. Reheat at 350°F for 10–15 minutes or toast slices as needed.
- Reviving: If the crust softens, warm it in a hot oven for 5–10 minutes to crisp it back up.
For entertaining, I love slicing and serving this bread with spreads or dips, like a whipped herb butter or garlicky cheese dip. Or turn it into a crunchy snack—these cheese straws and cheesy Gruyère crackers are fun alternatives to serve alongside.
Your Garlic Herb Bread Questions Answered
What is the secret to crusty no-knead bread?
The secret lies in baking inside a preheated Dutch oven, which traps steam and mimics a bakery-style oven. That trapped moisture helps the dough expand before forming a crackly, golden crust. Letting the dough ferment overnight adds flavor and improves structure.
Can I use fresh herbs instead of dried in no-knead bread?
Absolutely. Fresh herbs offer brighter, more intense flavor. Use three times more fresh herbs than dried. For example, replace 1 tablespoon of dried Italian herbs with 3 tablespoons of chopped fresh rosemary and thyme. Avoid water-heavy herbs like basil unless dried or minced finely.
How long should no-knead bread rise?
For best results, let the dough rise at room temperature for 12–18 hours. This slow rise allows natural fermentation to develop flavor and structure. You can also refrigerate the dough for up to 3 days, just like in many sourdough methods, then bake directly from the fridge or after bringing to room temp.
Can I bake no-knead bread without a Dutch oven?
Yes. If you don’t have a Dutch oven, use a cast iron skillet, clay baker, or heavy baking dish with foil or a lid. Just ensure it’s oven-safe at 450°F. For extra crust, place a pan of boiling water in the bottom of your oven to create steam.
Conclusion
Whether you’re a first-time baker or someone who’s simply short on time, this no-knead garlic herb bread is the perfect introduction to artisan baking. With minimal ingredients, zero kneading, and maximum flavor, this bread proves that simple can still be sensational.
It pairs perfectly with pasta, soups, and cozy weekend meals—or just toast it with melted butter for a late-night snack. You’ve got options—and they’re delicious.